HMAS Australia 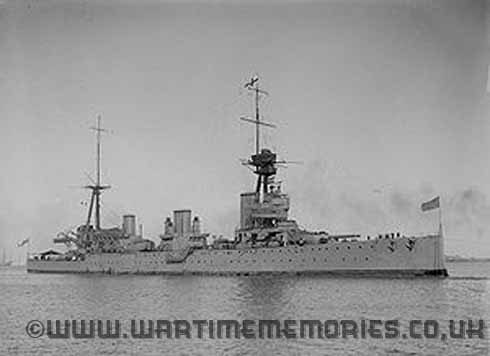
HMAS Australia
HMAS Australia was one of three Indefatigable-class battlecruisers built for the defence of the British Empire. Ordered by the Australian government in 1909, she was launched in 1911, and commissioned as flagship of the fledgling Royal Australian Navy (RAN) in 1913. Australia was the only capital ship ever to serve in the RAN. At the start of World War I, Australia was tasked with finding and destroying the German East Asia Squadron, which was prompted to withdraw from the Pacific by the battlecruiser's presence. Repeated diversions to support the capture of German colonies in New Guinea and Samoa, as well as an overcautious Admiralty, prevented the battlecruiser from engaging the German squadron before the latter's destruction. Australia was then assigned to North Sea operations, which consisted primarily of patrols and exercises, until the end of the war. During this time, Australia was involved in early attempts at naval aviation, and 11 of her personnel participated in the Zeebrugge Raid. The battlecruiser was not at the Battle of Jutland, as she was undergoing repairs following a collision with sister ship HMS New Zealand.
Australia only ever fired in anger twice: at a German merchant vessel in January 1915, and at a suspected submarine contact in December 1917. On her return to Australian waters, several sailors aboard the warship mutinied after a request for an extra day's leave in Fremantle was denied, although other issues played a part in the mutiny, including minimal leave during the war, problems with pay, and the perception that Royal Navy personnel were more likely to receive promotions than Australian sailors. Post-war budget cuts saw Australia's role downgraded to a training ship before she was placed in reserve in 1921. The disarmament provisions of the Washington Naval Treaty required the destruction of Australia as part of Britain's commitment, and she was scuttled off Sydney Heads in 1924.
- Namesake: Nation of Australia
- Ordered: 9 December 1909
- Builder: John Brown & Company, Clydebank
- Yard number: 402
- Laid down: 26 June 1910
- Launched: 25 October 1911
- Commissioned: 21 June 1913
- Decommissioned: 12 December 1921
- Fate: Scuttled, 12 April 1924
Following her commissioning, Australia hosted several official events.
On 30 June, King George V and Edward, Prince of Wales, visited Australia to farewell the ship. During this visit, King George knighted Patey on the ship's quarterdeck—the first time a naval officer was knighted aboard a warship since Francis Drake. On 1 July, Patey hosted a luncheon which was attended by imperial dignitaries, including Reid, the Agents-General of the Australian states, First Lord of the Admiralty Winston Churchill, Secretary of State for the Colonies Lewis Harcourt, and the High Commissioners of other British Dominions. That afternoon, 600 Australian expatriates were invited to a ceremonial farewelling and were entertained by shows and fireworks. Journalists and cinematographers were allowed aboard to report on Australia prior to her departure and an official reporter was embarked for the voyage to Australia. His role was to promote the ship as a symbol of the bond between Australia and the United Kingdom. Australia was escorted by the light cruiser HMAS Sydney during the voyage to Australia.
On 25 July, the two ships left England for South Africa. The visit was part of an agreement between the Prime Ministers of Australia and South Africa to promote the link between the two nations, along with the nations' links to the rest of the British Empire. The two ships were anchored in Table Bay from 18 to 26 August, during which the ships' companies participated in parades and receptions, while tens of thousands of people came to observe the ships. The two ships also visited Simon's Town, while Australia additionally called into Durban. No other major ports were visited on the voyage, and the warships were instructed to avoid all major Australian ports. Australia and Sydney reached Jervis Bay on 2 October, where they rendezvoused with the rest of the RAN fleet (the cruisers Encounter and Melbourne, and the destroyers Parramatta, Warrego, and Yarra). The seven warships prepared for a formal fleet entry into Sydney Harbour. On 4 October, Australia led the fleet into Sydney Harbour, where responsibility for Australian naval defence was passed from the Royal Navy's Australia Squadron, commanded by King-Hall aboard HMS Cambrian, to the RAN, commanded by Patey aboard Australia.
Early service
In her first year of service, Australia visited as many major Australian ports as possible, in order to expose the new navy to the widest possible audience and induce feelings of nationhood. Naval historian David Stevens claims that these visits did more to break down state rivalries and promote the unity of Australia as a federated commonwealth than any other event.
During late 1913, footage for the film Sea Dogs of Australia was filmed aboard the battlecruiser; the film was withdrawn almost immediately after first screening in August 1914 because of security concerns. During July 1914, Australia and other units of the RAN fleet were on a training cruise in Queensland waters. On 27 July, the Australian Commonwealth Naval Board learned through press telegrams that the British Admiralty thought that there would be imminent and widespread war in Europe following the July Crisis, and had begun to position its fleets as a precaution. Three days later, the Board learned that the official warning telegram had been sent: at 22:30, Australia was recalled to Sydney to take on coal and stores.
On 3 August, the RAN was placed under Admiralty control. Orders for RAN warships were prepared over the next few days. Australia was assigned to the concentration of British naval power on the China Station, but was allowed to seek out and destroy any armoured warships (particularly those of the German East Asia Squadron) in the Australian Station before doing so. Vice Admiral Maximilian von Spee, commander of the German squadron, was aware of Australia's presence in the region and her superiority to his entire force. The German admiral's plan was to harass British shipping and colonies in the Pacific until the presence of Australia and the China Squadron forced his fleet to relocate to other seas.
World War I - Securing local waters
The British Empire declared war on Germany on 5 August, and the RAN swung into action. Australia had departed Sydney the night before, and was heading north to rendezvous with other RAN vessels south of German New Guinea. The German colonial capital of Rabaul was considered a likely base of operations for von Spee, and Patey put together a plan to clear the harbour. Australia's role was to hang backand, if the armoured cruisers SMS Scharnhorst and SMS Gneisenau were present, the other RAN vessels would lure them into range of the battlecruiser. The night-time operation was executed on 11 August, and no German ships were found in the harbour.
Over the next two days, Australia and the other ships unsuccessfully searched the nearby bays and coastline for the German ships and any wireless stations, before returning to Port Moresby to refuel. In late August, Australia and Melbourne escorted a New Zealand occupation force to German Samoa. Patey believed that the German fleet was likely to be in the eastern Pacific, and Samoa would be a logical move. Providing protection for the New Zealand troopships was a beneficial coincidence, although the timing could have been better, as an Australian expedition to occupy German New Guinea departed from Sydney a few days after the New Zealand force left home waters—Australia was expected to support both, but Patey only learned of the expeditions after they had commenced their journeys. The battlecruiser left Port Moresby on 17 August and was met by Melbourne en route on 20 August. The next day, they reached Nouméa and the New Zealand occupation force, consisting of the troopships Moeraki and Monowai, the French cruiser Montcalm, and three Pelorus-class cruisers. The grounding of Monowai delayed the expedition's departure until 23 August so the ships reached Suva, Fiji on 26 August, and arrived off Apia early in the morning of 30 August. The city surrendered without a fight, freeing Australia and Melbourne to depart at noon on 31 August to meet the Australian force bound for Rabaul. The Australian invasion force had mustered off the Louisiade Archipelago by 9 September; the assembled ships included Australia, the cruisers Sydney, and Encounter, the destroyers Parramatta, Warrego, and Yarra, the submarines AE1 and AE2, the auxiliary cruiser HMAS Berrima, the storeship SS Aorangi, three colliers and an oiler. The force sailed north, and at 0600 on 11 September, Australia deployed two picket boats to secure Karavia Bay for the expeditionary force's transports and supply ships.
Later that day, Australia captured the German steamer Sumatra off Cape Tawui. After this, the battlecruiser stood off, in case she was required to shell one of the two wireless stations the occupation force was attempting to capture. The German colony was captured, and on 15 September, Australia departed for Sydney.
Pursuit of von Spee
The presence of Australia around the former German colonies, combined with the likelihood of Japan declaring war on Germany, prompted von Spee to withdraw his ships from the region. On 13 August, the East Asia Squadron—with the exception of SMS Emden, which was sent to prey on British shipping in the Indian Ocean—had begun to move eastwards. After appearing off Samoa on 14 September, then attacking Tahiti eight days later, von Spee led his force to South America, and from there planned to sail for the Atlantic.
Patey was ordered on 17 September to head back north with Australia and Sydney to protect the Australian expeditionary force. On 1 October, Australia, Sydney, Montcalm, and Encounter headed north from Rabaul to find the German ships, but turned around to return at midnight, after receiving an Admiralty message about the Tahiti attack. Although Patey suspected that the Germans were heading for South America and wanted to follow with Australia, the Admiralty was unsure that the intelligence was accurate and tasked the battlecruiser with patrolling around Fiji in case they returned.
Australia reached Suva on 12 October and spent the next four weeks patrolling the waters around Fiji, Samoa, and New Caledonia. Despite Patey's desires to range out further, Admiralty orders kept him chained to Suva until early November. As Patey predicted, von Spee had continued east, and it was not until his force inflicted the first defeat on the Royal Navy in 100 years at the Battle of Coronel that Australia was allowed to pursue.
Departing on 8 November, the battlecruiser replenished coal from a pre-positioned collier on 14 November, and reached Chamela Bay (near Manzanillo, Mexico) 12 days later. Patey was made commander of a multinational squadron tasked with preventing the German squadron from sailing north to Canadian waters, or following them if they attempted to enter the Atlantic via the Panama Canal or around Cape Horn. Patey's ships included Australia, the British light cruiser HMS Newcastle and the Japanese cruisers Izumo, Asama, and the ex-Russian battleship Hizen.
The ships made for the Galapagos Islands, which were searched from 4 to 6 December. After finding no trace of von Spee's force, the Admiralty ordered Patey to investigate the South American coast from Perlas Island down to the Gulf of Guayaquil. The German squadron had sailed for the Atlantic via Cape Horn and was defeated by a British fleet after attempting to raid the Falkland Islands on 8 December. Patey's squadron learned of this 10 December, while off the Gulf of Panama; Australia's personnel were disappointed that they did not have the chance to take on Scharnhorst and Gneisenau. Nevertheless, the battlecruiser's presence in the Pacific during 1914 had provided an important counter to the German armoured cruisers, and enabled the RAN to participate in the Admiralty's global strategy. Moreover, it is unlikely that the attack on Rabaul would have gone ahead had Australia not been available to protect the landing force.
North Sea operations
As the threat of a German naval attack had been removed by the destruction of the East Asia Squadron, Australia was free for deployment elsewhere.
Initially, the battlecruiser was to serve as flagship of the West Indies Squadron, with the task of pursuing and destroying any German vessels that evaded North Sea blockades. Australia was ordered to sail to Jamaica via the Panama Canal, but as it was closed to heavy shipping, she was forced to sail down the coast of South America and pass through the Strait of Magellan during 31 December 1914 and 1 January 1915. Australia is the only ship of the RAN to cross from the Pacific to the Atlantic by sailing under South America. During the crossing, one of the warship's propellers was damaged, and she had to limp to the Falkland Islands at half speed.
Temporary repairs were made, and Australia departed on 5 January.
A vessel well clear of the usual shipping routes was spotted on the afternoon of the next day, and the battlecruiser attempted to pursue, but was hampered by the damaged propeller. Unable to close the gap before sunset, a warning shot was fired from 'A' turret, which caused the ship—the former German passenger liner, now naval auxiliary Eleonora Woermann—to stop and be captured. As Australia could not spare enough personnel to crew the merchant ship, and Eleonora Woermann was too slow to keep pace with the battlecruiser, the crew was taken aboard and the ship was sunk. Following the Battle of Dogger Bank, the Admiralty saw the need for dedicated battlecruiser squadrons in British waters and earmarked Australia to lead one of them. On 11 January, while en route to Jamaica, Australia was diverted to Gibraltar. Reaching there on 20 January, the battlecruiser was ordered to proceed to Plymouth, where she arrived on 28 January and paid off for a short refit. The docking was completed on 12 February, and Australia reached Rosyth on 17 February after sailing through a gale.
She was made flagship of the 2nd Battlecruiser Squadron (2nd BCS) of the Battlecruiser Fleet, part of the British Grand Fleet on 22 February.
Vice Admiral Patey was appointed to command this squadron. In early March, to avoid a conflict of seniority between Patey and the leader of the Battlecruiser Fleet, Vice Admiral David Beatty, Patey was reassigned to the West Indies, and Rear Admiral William Pakenham raised his flag aboard Australia. British and Allied ships deployed to the North Sea were tasked with protecting the British Isles from German naval attack, and keeping the German High Seas Fleet penned in European waters through a distant blockade while trying to lure them into a decisive battle. During her time with the 2nd BCS, Australia's operations primarily consisted of training exercises (either in isolation or with other ships), patrols of the North Sea area in response to actual or perceived German movements, and some escort work.
These duties were so monotonous, one sailor was driven insane. Australia joined the Grand Fleet in a sortie on 29 March, in response to intelligence that the German fleet was leaving port as the precursor to a major operation. By the next night, the German ships had withdrawn, and Australia returned to Rosyth. On 11 April, the British fleet was again deployed on the intelligence that a German force was planning an operation. The Germans intended to lay mines at the Swarte Bank, but after a scouting Zeppelin located a British light cruiser squadron, they began to prepare for what they thought was a British attack. Heavy fog and the need to refuel caused Australia and the British vessels to return to port on 17 August and, although they were redeployed that night, they were unable to stop two German light cruisers from laying the minefield. From 26 to 28 January 1916, the 2nd BCS was positioned off the Skagerrak while the 1st Light Cruiser Squadron swept the strait in an unsuccessful search of a possible minelayer. On the morning of 21 April, Australia and her sister ships sailed again for the Skagerrak, this time to support efforts to disrupt the transport of Swedish ore to Germany. The planned destroyer sweep of the Kattegat was cancelled when word came that the High Seas Fleet was mobilising for an operation of their own (later learned to be timed to coincide with the Irish Easter Rising) and the British ships were ordered to a rendezvous point in the middle of the North Sea, while the rest of the Grand Fleet made for the south-eastern end of the Long Forties. On the afternoon of 22 April, the Battlecruiser Fleet was patrolling to the north-west of Horn Reefs when heavy fog came down. The ships were zigzagging to avoid submarine attack, which, combined with the weather conditions, caused Australia to collide with sister ship HMS New Zealand twice in three minutes. Procedural errors were found to be the cause of the collisions, which saw Australia (the more heavily damaged of the two ships) docked for six weeks of repairs between April and June 1916. Initial inspections of the damage were made in a floating dock on the River Tyne, but the nature of the damage required a diversion to Devonport, Devon for the actual repair work. The repairs were completed more quickly than expected and Australia rejoined the 2nd BCS Squadron at Rosyth on 9 June, having missed the Battle of Jutland.
On the evening of 18 August, the Grand Fleet put to sea in response to a message deciphered by Room 40, which indicated that the High Seas Fleet, minus II Squadron, would be leaving harbour that night. The German objective was to bombard Sunderland on 19 August, with extensive reconnaissance provided by airships and submarines. The Grand Fleet sailed with 29 dreadnought battleships and 6 battlecruisers. Throughout the next day, Jellicoe and Scheer received conflicting intelligence, with the result that having reached its rendezvous in the North Sea, the Grand Fleet steered north in the erroneous belief that it had entered a minefield before turning south again. Scheer steered south-eastward to pursue a lone British battle squadron sighted by an airship, which was in fact the Harwich Force under Commodore Tyrwhitt. Having realised their mistake, the Germans changed course for home. The only contact came in the evening when Tyrwhitt sighted the High Seas Fleet but was unable to achieve an advantageous attack position before dark, and broke off. Both the British and German fleets returned home, with two British cruisers sunk by submarines and a German dreadnought battleship damaged by a torpedo.
The year 1917 saw a continuation of the battlecruiser's routine of exercises and patrols into the North Sea, with few incidents.
During this year Australia's activities were limited to training voyages between Rosyth and Scapa Flow and occasional patrols to the north-east of Britain in search of German raiders. In May, while preparing the warship for action stations, a 12-inch shell became jammed in the shell hoist when its fuze became hooked onto a projection. After the magazines were evacuated, Lieutenant-Commander F. C. Darley climbed down the hoist and successfully removed the fuze. On 26 June, King George V visited the ship.
On 12 December, Australia was involved in a second collision, this time with the battlecruiser HMS Repulse. Following this accident, she underwent three weeks of repairs from December 1917 until January 1918. During the repair period, Australia became the first RAN ship to launch an aircraft, when a Sopwith Pup took off from her quarterdeck on 18 December. On 30 December, Australia shelled a suspected submarine contact, the only time during her deployment with the 2nd BCS that she fired on the enemy.
In February 1918, the call went out for volunteers to participate in a special mission to close the port of Zeebrugge using blockships.
Although many aboard Australia volunteered their services in an attempt to escape the drudgery of North Sea patrols, only 11 personnel—10 sailors and an engineering lieutenant—were selected for the raid, which occurred on 23 April. The lieutenant was posted to the engine room of the requisitioned ferry HMS Iris II, and was awarded the Distinguished Service Medal (DSM) for his efforts. The other Australians were assigned to the boiler rooms of the blockship Thetis, or as part of a storming party along the mole.
All ten sailors survived—Australia was the only ship to have no casualties from the raid—and three were awarded the DSM, while another three were mentioned in dispatches. One of the sailors was listed in the ballot to receive a Victoria Cross, but he did not receive the award. During 1918, Australia and the Grand Fleet's other capital ships on occasion escorted convoys travelling between Britain and Norway. The 2nd BCS spent the period from 8 to 21 February covering these convoys in company with battleships and destroyers, and put to sea on 6 March in company with the 1st Battlecruiser Squadron to support minelayers. From 8 March on, the battlecruiser tested the capabilities of aircraft launched from platforms mounted over 'P' and 'Q' turrets. Australia, along with the rest of the Grand Fleet, sortied on the afternoon of 23 March 1918 after radio transmissions had revealed that the High Seas Fleet was at sea after a failed attempt to intercept the regular British convoy to Norway. However, the Germans were too far ahead of the British and escaped without firing a shot. The 2nd BCS sailed again on 25 April to support minelayers, then cover one of the Scandinavian convoys the next day. Following the successful launch of a fully laden Sopwith 1½ Strutter scout plane on 14 May, Australia started carrying two aircraft (a Strutter for reconnaissance, and a Sopwith Camel fighter) and operated them until the end of the war. The 2nd BCS again supported minelayers in the North Sea between 25,26 June and 29,30 July. During September and October, Australia and the 2nd BCS supervised and protected minelaying operations north of Orkney.
War's end
When the armistice with Germany was signed on 11 November 1918 to end World War I, one of the conditions was that the German High Seas Fleet was to be interred at Scapa Flow. The German fleet crossed the North Sea and, on 21 November, the British Grand Fleet sailed out to meet it. Australia led the port division of the fleet. Australia then escorted the battlecruiser SMS Hindenburg to Scapa Flow and was assigned as the German vessel's guardship.
Australia subsequently formed part of the force which guarded the High Seas Fleet during late 1918 and early 1919 and spent much of her time either at anchor at Scapa Flow, or conducting patrols in the North Sea. This monotonous duty contributed to low morale among some sections of the ship's crew. After being formally farewelled by the Prince of Wales and First Sea Lord Rosslyn Wemyss on 22 April 1919, Australia departed from Portsmouth for home the next day. She sailed in company with HMAS Brisbane for the first part of the voyage, but the light cruiser later had to detach to tow the submarine J5. Australia arrived in Fremantle on 28 May 1919, the first time the ship had seen home waters in four and a half years. Despite returning home, the battlecruiser remained under Admiralty control until 1 August 1919. Australia was not awarded any official battle honours, although personnel aboard the battlecruiser and her successor claimed the operations in the Pacific, the North Sea patrol duties, and the battlecruiser's presence at the surrender of the German High Seas Fleet as unofficial honours. Following a reorganisation of RAN battle honours in 2010, the honours "Rabaul 1914" and "North Sea 1915,18" were retroactively awarded on 1 March 2010.
Mutiny
Post-war
In May 1920, Australia participated in celebrations and naval activities associated with the visit of the Prince of Wales. From July to November 1920, an Avro 504 floatplane of the Australian Air Corps was embarked aboard Australia as part of a series of trials intended to cumulate in the creation of a naval aviation branch. The aircraft was stored on the quarterdeck next to 'Q' turret, and was deployed and recovered by derrick.
Inter-service rivalry and the ship's reduction to non-seagoing status in September prevented further operations. Following the demise of German naval power in the Pacific the fleet unit concept was no longer seen as being relevant, and Australia did not have a clear role. As a result, post-war budget cuts prompted the RAN to take the battlecruiser out of active service, as the large share of resources and manpower consumed by Australia could be better used elsewhere in the RAN. In August 1920 the battlecruiser was rated by the Naval Board as 11th out of the RAN's 12 priorities.
Accordingly, her crew was reduced later that year and she was assigned to Flinders Naval Depot as a gunnery and torpedo training ship. In the event of a major conflict, Australia was to serve in a role akin to coastal artillery. She was not considered to have been placed in reserve at this time, however, as it was not possible for the RAN to provide a trained crew at short notice.
Decommissioning and fate
Australia returned to Sydney in November 1921, and was paid off into reserve in December. By this time battlecruisers built before the Battle of Jutland were considered obsolete, and there is no record of the Admiralty suggesting that Australia purchase a replacement. Moreover, it is unlikely that the Australian Government would have agreed to such a suggestion given the prevailing political and financial conditions. As the Admiralty had decided to phase out 12-inch guns and had stopped the manufacture of shells for these weapons shortly after the war, it would have been necessary to replace Australia's main armament once the Navy's stock of shells reached their expiry date given that it was not possible to produce replacement shells in Australia. This was also not financially feasible for the government, particularly given the RAN's lack of interest in retaining the ship. The 1922 Washington Naval Treaty was a mutual naval arms limitation and disarmament treaty between the five major naval powers of the time (the United Kingdom, the United States of America, Japan, Italy, and France).
One of the main aspects of the treaty was the limitation on the number and size of capital ships each nation possessed. As the RAN was counted as part of the Royal Navy for the purposes of the treaty, Australia was one of the battlecruisers nominated for disposal to meet the British limit.
The battlecruiser had to be made unusable for warlike activities within six months of the treaty's ratification, then disposed of by scuttling, as Australia did not have the facilities to break her up for scrap, and the British share of target ships was taken up by Royal Navy vessels.
This was the only time the Australian military has been affected by a disarmament treaty until the 1997 Ottawa Treaty banning the use of anti-personnel mines. Some equipment had been removed when Australia was decommissioned for use in other ships, but after the November 1923 decision by the Cabinet confirming the scuttling, RAN personnel and private contractors began to remove piping and other small fittings. Between November 1923 and January 1924, £68,000 of equipment was reclaimed; over half was donated to tertiary education centres (some of which was still in use in the 1970s), while the rest was either marked for use in future warships, or sold as souvenirs. Some consideration was given to reusing Australia's 12-inch guns in coastal fortifications, but this did not occur as ammunition for these weapons was no longer being manufactured by the British, and the cost of building suitable structures was excessive.
It was instead decided to sink the gun turrets and spare barrels with the rest of the ship. There was also a proposal to remove Australia's conning tower and install it on the Sydney Harbour foreshore; although this did not go ahead, the idea was later used when the foremast of HMAS Sydney was erected as a monument at Bradleys Head. The ship's outer starboard propeller is on display at the Australian War Memorial, while other artefacts are in the collections of the War Memorial, the Australian National Maritime Museum, and the Royal Australian Navy Heritage Centre.
The scuttling was originally scheduled for Anzac Day (25 April) 1924, but was brought forward to 12 April, so the visiting British Special Service Squadron could participate. On the day of the sinking, Australia was towed out to a point 25 nautical miles north east of Sydney Heads. Under the terms of the Washington Treaty, the battlecruiser needed to be sunk in water that was deep enough to make it infeasible to refloat her at a future date. The former flagship was escorted by the Australian warships Melbourne, Brisbane, Adelaide, Anzac, and Stalwart, the ships of the Special Service Squadron, and several civilian ferries carrying passengers.
Many personnel volunteered to be part of the scuttling party, but only those who had served aboard her were selected. At 1430, the scuttling party set the charges, opened all seacocks, and cleared the ship. Explosive charges blew a hole in the hull a few minutes later, but it took 20 minutes for the intake of water to bring holes cut in the battlecruiser's upper flanks to the waterline. The angle of list increased significantly, causing the three spare 12-inch barrels lashed to the deck to break free and roll overboard, before Australia inverted completely and began to sink stern-first. Australia submerged completely at 1451. A Royal Australian Air Force aircraft dropped a wreath where the warship had sunk, while Brisbane fired a rolling 21-gun salute. The wreck was gazetted as being at 33°53'25?S 151°46'5?E, 270 metres (890 ft) below. However, there were discrepancies with other sources and the exact location of Australia was unknown. There are two schools of thought surrounding the decision to scuttle the battlecruiser. The first is that sinking Australia was a major blow to the nation's ability to defend herself. Following the battlecruiser's scuttling, the most powerful warships in the RAN were four old light cruisers. The battlecruiser had served as a deterrent to German naval action against Australia during the war and with growing tensions between Japan and the United States of America, that deterrence may have been required if the nations became openly hostile towards each other or towards Australia. The opposing argument is that, while an emotive and symbolic loss, the ship was obsolete, and would have been a drain on resources.
Operating and maintaining the warship was beyond the capabilities of the RAN's post-war budgets, necessitating the ship's reduction in status in 1920 and assignment to reserve in 1921. Ammunition and replacement barrels for the main guns were no longer manufactured. To remain effective, Australia required major modernisation (including new propulsion machinery, increased armour and armament, and new fire control systems) at a cost equivalent to a new County-class cruiser. In 1990, a large, unknown shipwreck was encountered by the Furgo Seafloor Surveys vessel MV Moana Wave 1 while surveying the path of the Pacific Rim West Submarine Telecommunications Cable. One of the survey ship's crew theorised that the wreck, located at 33°51'54.21?S 151°44'25.11?E in 390 metres (1,280 ft) of water, was Australia, but Furgo kept the information to themselves until 2002, when the company's Australian branch mentioned the discovery during a conference. This piqued the interest of a member of the New South Wales Heritage Office (now the Heritage Branch of the New South Wales Office of Environment and Heritage) requested copies of the company's data. The size and location of the ship pointed towards it being Australia, but the depth meant verification through inspection could only be achieved with a remote operated vehicle. The RAN was approached in 2007 for assistance, but although they supported the project, the RAN did not have the equipment to assist. In March 2007, the United States Navy loaned the deep-sea ROV CURV-21 to the Australian Government, to locate and recover a Black Hawk helicopter which crashed during the Australian response to the 2006 Fijian coup d'état. While en route back to Australia, the ROV, carried aboard Defence Maritime Services vessel Seahorse Standard, was directed to Furgo's coordinates at the request of the NSW Heritage Office to verify and inspect the wreck. Video footage captured by the ROV allowed the NSW Heritage Office to confirm that the wreck was Australia by matching features like the superstructure and masts to historical photographs. Although initially sinking stern-first, the battlecruiser levelled out as she sank, with the aft mast the first to strike the bottom. After hitting the seabed, Australia slid about 400 metres (1,300 ft) to her final resting place.
The wreck site is protected under the federal Historic Shipwrecks Act 1976.
John Doran
3rd Jan 1915 Cruiser Docks
5th Jan 1915 Enemy Ship Sunk
If you can provide any additional information, please add it here.