|
This website uses cookies. By continuing to use this site you agree to accept cookies. If you enjoy this site please consider making a donation. 
Features Submissions Information Advertisements 
|
The Wartime Memories Project - The Great War - Day by Day
1st November 1914
On this day:
- 8th Yorks & Lancs to Aldershot The 8th Yorks and Lancs leave Frensham and move to Aldershot in November 1914.
- 10th Leicesters formed The 10th Battalion Leicestershire Regiment was formed at Fort Nelson, near Portsmouth.
- Regroup all fighting troops
- Orders
- Pioneering Work
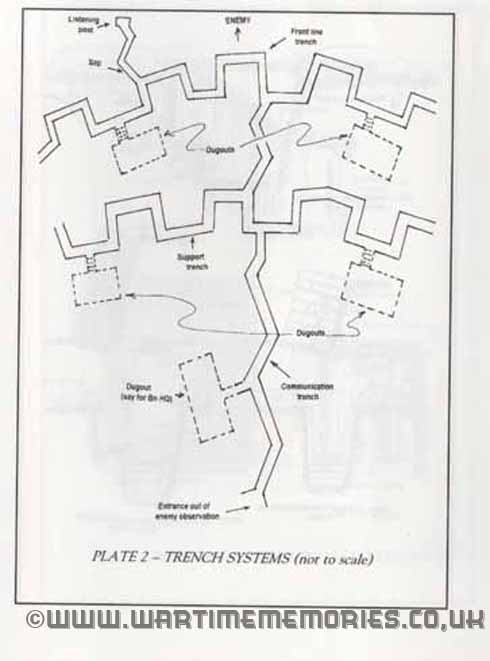
Typical Trench System Layout (Not to scale)
16th Bn Royal Irish Rifles (Pioneers)'
Reader guidance note:There are entries on 2,3,4,5 and 6th November 1914.
Trench Warfare in WW1. After the initial assault by Germany was finally halted, the remainder of the war was fought from entrenched positions on both sides. Basically the two Front Line trenches faced each other from varying distances. They were not in straight lines as firing along the trench by the enemy would have had catastrophic consequences, rather in zigzag formations making a continuous line to adjoining defences - either a physical barrier or a neighbouring military unit. So for years the trench positions continuously changed hands as battles were won or lost. In particularly bad weather this led to virtual seas of mud in what was termed "No Man’s Land" from the combination of weather and artillery shells.
Behind the Front Line trench were supporting trenches similarly fashioned and linked by communication trenches. Dugouts to provide safe shelter were provided in strategic areas together with strong points such as machine gun and mortar emplacements.
Trenches were further protected by Wiring in front. This was basically lines of barbed wire to hold back attacking forces.
Trenches were initially dug to existing old military manuals, but from early experience were found to be too shallow and too narrow for the rapid movement of supplies and equipment, so a lot of work would be needed in widening and deepening the earlier trenches.
Other trench works included: Revetment, which is lining the sides of a trench with padding materials ( to help protect from back-blast from exploding shells) which could be sandbags, timber or earthworks and in some cases concrete. This also included firing steps and duckboards to facilitate drainage.
Dugouts as the name suggest are deep enclosures providing some degree of safety during bombardments.
Saps, these were smaller trenches dug from the Front Line towards the enemy’s front lines. They were used as listening posts or for locating a machine gun or mortar and could also provide a jumping off point for an attack.
Other Structures: Craters and Camouflet - Another tactic employed was the use of explosives underground to either blow up the enemy trench positions themselves (mines) or disturb ground in no-man’s land exposing craters which could be connected up to their own front line, bringing them closer to the enemy’s front line. Sometimes the explosion would result in an underground cavern (called a Camouflet) which could be worked on under cover from enemy observation and often an initial start to Sapping itself as the surface could be quickly collapsed leaving the Sap ready for use.
Screening - This was simply erecting simple screens alongside roads and other locations which needed to be kept out of sight from the enemy, usually when the enemy occupied higher ground overlooking support and communication rear areas. This was to minimise observation opportunities for snipers or artillery observers.
Pioneer support work in attack or defence: During an offensive operation the Pioneers would have to turn around the firing positions in captured trenches provided the gains were held. They would also have to join up their former front line with the captured trenches by new communication trenches often using their own saps as starting points closer to the former enemy trenches.
The reverse was also true and if their lines were overrun they would have prepared previous positions for troops to fall back on and if given sufficient time try to render the lost trenches virtually useless to the enemy.
Road works. Naturally a huge logistic problem was supply of Ammunition, rations and equipment which had to be got to the Front Line troop positions. Roads had to be drained in bad weather, repaired when damaged by explosives, flooding and heavy traffic.
Railways. Main line railways were vital to forward movement of bulk material, equipment, men and animals over longer distances. However there were also some light, narrow gauge - systems and trench railways. Equipment would be transported by main line railway to large depots from which it would be forwarded by road or smaller gauge light railways closer to the front. It would then be brought through the communication trenches manually or using the trench tramways to the front itself. The trench railways or tramways involved hauling trolleys through communication trenches to keep the front lines supplied and remove salvage and waste materials on return journeys. They were operated by a party of 6 to 8 men per trolley. It was also used to return casualties to rear areas for treatment. This was the main reason for the extensive programme of trench widening and deepening so that men and trolleys could move freely on tracks out of sight from the enemy though still in danger from enemy artillery if targeted.
Doran Family- 2nd Life Guards South of Hooge The 2nd Life Guards first moved into the wood 1/2 mile South of Hooge being slightly shelled but no casualties. About 3 pm the Regiment was dispatched to Zwarteten where it was dismounted. D squadron and machine guns were sent forward on left of 2 sqdns of Royal Dragoons in support of the Irish Guards where line had been very severely shelled. Trenches were occupied on the south edge of the wood until about 9.30 pm when these were again taken over by the Irish Guards who had been reformed. Finally the Regiment returned to bivouac in a field to the immediate south of Hooge by 1.30 am. Casualties; 3 men killed, 2 wounded, 2 horses killed, 1 wounded
War Diary- On the Move
- HMS Monmouth lost with all hands HMS Monmouth was sunk by gunfire on 1st November 1914 by the German armoured cruisers SMS Scharnhorst and SMS Gneisenau off the Chilean Coast during the Battle of Coronel, the entire crew was lost. In October 1914 Admiral Cradock had learnt that Admiral von Spee, at the head of a squadron of five modern cruisers, was planning to leave the Pacific for the South Atlantic. Cradock decided to move into the Pacific in an attempt to prevent this. At Coronel (1 November 1914) Cradock was effectively ambushed by von Spee’s squadron. The Monmouth’s 6in guns were outranged by the 8.2in guns carried on von Spee’s best ships, the Scharnhorst and the Gneisenau. The Monmouth was lost with all hands without being able to inflict any damage on the German ships.
- Battle of Coronel The naval Battle of Coronel took place on 1 November 1914 off the coast of central Chile near the city of Coronel. German Kaiserliche Marine forces led by Vice-Admiral Graf Maximilian von Spee met and defeated a Royal Navy squadron commanded by Rear-Admiral Sir Christopher Cradock. The engagement probably took place as a result of a series of misunderstandings. Neither admiral expected to meet the other in full force. Once the two met, Cradock understood his orders were to fight to the end, despite the odds being heavily against him. Although Spee had an easy victory, destroying two enemy armoured cruisers for just three men injured, the engagement also cost him half his supply of ammunition, which was impossible to replace. Shock at the British losses led to an immediate reaction and the sending of more ships which in turn destroyed Spee and the majority of his squadron at the Battle of the Falkland Islands.
The Royal Navy, along with Allied navies in the far east, had captured the German colonies of Kaiser-Wilhelmsland, Yap, Nauru and Samoa early in the war. Vice-Admiral Maximilian von Spee's German East Asia Squadron had abandoned its base at Tsingtao in China once Japan entered the war on Britain's side. Eventually, the British Admiralty concentrated the search in the western Pacific after Spee's squadron bombarded Papeete. On the 5th October an intercepted radio communication revealed Spee's plan to attack shipping along the west coast of South America. Rear-Admiral Sir Christopher Cradock's South Atlantic Squadron (HMS Good Hope (Cradock's flagship), HMS Monmouth, HMS Glasgow, three other light cruisers, a converted liner,HMS Otranto and two other armed merchantmen) were patrolling the area. Cradock's force was also to have been reinforced by the more powerful armoured cruiser HMS Defence, but the old pre-dreadnought battleship HMS Canopus was ordered to join him instead. The last-minute change left the British squadron with either obsolete or under-armed vessels, all crewed by inexperienced naval reservists. Monmouth and the Good Hope had a large number of 6-inch guns but only the Good Hope was equipped with two heavier 9.2-inch guns mounted in single turrets. In contrast, von Spee had five modern vessels (the armoured cruisers SMS Scharnhorst and Gneisenau and the light cruisers SMS Dresden, Leipzig and Nürnberg), all led by officers handpicked by Grand Admiral Alfred von Tirpitz himself. Scharnhorst and Gneisenau were armed with eight 8.2 in guns each, which gave them an overwhelming advantage in range and firepower. This advantage was further compounded as the crews of both ships had earned accolades for their gunnery skill prior to the war. Cradock's orders were to "be prepared to meet them " with no effort made to clarify what action Cradock was expected to take, should he find von Spee. On receiving his orders, Cradock asked the Admiralty for permission to split his fleet into two forces to operate on the east and west coasts of South America. This was to stop von Spee slipping past Cradock and moving into the Atlantic. The Admiralty agreed and the east coast squadron, consisting of three cruisers and two armed merchantmen, was formed under Rear-Admiral A. P. Stoddart. The remaining vessels formed Cradock’s west coast squadron which was reinforced by HMS Canopus which finally arrived on 18 October. She was only able to manage a top speed of 14 mph which was just over half that of the remainder of the squadron. The Admiralty recognised that her slow speed meant the fleet would not be fast enough to force an engagement and also that without the Canopus the fleet stood no chance against von Spee. Cradock was told to use Canopus as security for the cruisers and maintain contact with von Spee while avoiding any risky engagements.The Chief of the Admiralty War Staff, Vice-Admiral Sir Doveton Sturdee,requested additional ships be sent to reinforce Cradock, but this was vetoed (by First Lord of the Admiralty, Winston Churchill and First Sea Lord of the Admiralty, Prince Louis of Battenberg) on the grounds that Canopus was "sufficient reinforcement".
Opening gambit
On 22 October, Cradock cabled the Admiralty of his intentions to round Cape Horn leaving Canopus behind to escort his colliers. Admiral John Fisher replaced Battenberg as First Sea Lord on 27 October and Fisher immediately ordered Cradock not to engage von Spee without Canopus. He then ordered HMS Defence to reinforce Cradock. The previous week Cradock had sent Glasgow to Montevideo to pick up any messages from the Admiralty. Von Spee, having learned of the presence of Glasgow sailed south from Valparaíso with all five warships with the intention of destroying her. Glasgow, however, intercepted radio traffic from one of the German cruisers and informed Cradock who turned his fleet north to intercept the cruiser. On 31 October, his squadron adopted an attacking formation. Both sides expected a single ship until they sighted each other at 1640 on 1 November.
Battle
On 31 October, Glasgow entered Coronel harbour to collect messages and news from the British consul. One of Spee's supply ships, Göttingen, was also in the harbour and immediately radioed with the news of the British ship entering harbour. Glasgow was also listening to radio traffic, which suggested that German warships were close. Further confusion was caused as the German ships were all using the same call sign, that of Leipzig. Spee decided to move his ships to Coronel, to trap Glasgow, while Admiral Cradock turned north to catch Leipzig. Neither side realised the other's main force was nearby. At 0915 on 1 November, Glasgow left port to meet Cradock at noon, 40 miles west of Coronel. The seas were stormy so that it was impossible to send a boat between the ships to deliver the messages, which had to be transferred on a line floated in the sea. At 1350, the ships formed into a line of battle 15 miles apart and started to steam north at 10 knots searching for Leipzig. At 1617, Leipzig, accompanied by the other German ships, spotted smoke from the British ships. Von Spee ordered full speed so that Scharnhorst, Gneisenau and Leipzig were approaching the British at 20 knots, with the slower light cruisers Dresden and Nürnberg some way behind. At 1620, Glasgow and Otranto saw smoke to the north, and then three ships at a range of 12 miles. The British changed direction, so that both fleets were heading south. A chase began which lasted 90 minutes. Cradock was faced with a choice, either to take his three cruisers capable of 20 knots, abandon Otranto and run from the Germans, or stay and fight with Otranto which could only manage 16 knots. The German ships slowed at a range of 15,000 yd (13,720 m) to position themselves where the setting sun would outline the British Ships. At 1710, Cradock decided he must fight, and drew his ships closer together. He changed course to the south-east and attempted to close upon the German ships while the sun remained high. Von Spee declined to engage and turned his faster ships away, maintaining the distance between the forces which sailed roughly parallel at a distance of 14,000 yd (12,800 m). At 1818, Cradock again attempted to close, steering directly towards the enemy, which once again turned away to a greater range of 18,000 yd (16,460 m). At 1850, the sun set, so Spee closed to 12,000 yd (10,970 m) and commenced firing.
The German ships had sixteen 8.2 in (208 mm) guns of comparable range to the two 9.2 in (234 mm) guns on Good Hope and one of these was hit within five minutes of the engagement starting. Of the remaining 6 in (152 mm) guns on the British ships, most were in casemates along the sides of the ships, which continually flooded if the gun doors were opened to fire in heavy seas. The merchant cruiser Otranto, having only 4 in (100 mm) guns and being a much larger target than the other ships, retired west at full speed. With the British 6-inch guns having insufficient range to match the German 8-inch guns, Cradock attempted to close on the German ships. By 1930, he had reached 6,000 yd (5,490 m), but as he closed the German fire became correspondingly more accurate. Both Good Hope and Monmouth were on fire, presenting easy targets to the German gunners now that darkness had fallen, whereas the German ships had disappeared into the dark. Monmouth was first to be silenced. Good Hope continued firing, still trying to close on the German ships and receiving more and more fire. By 1950, she had also ceased firing; subsequently her forward section exploded, then she broke apart and sank with no one actually witnessing the sinking. Scharnhorst switched her fire towards Monmouth, while Gneisenau joined Leipzig and Dresden which had been engaging Glasgow. The German light cruisers had only 4.1 in (104 mm) guns, which had left Glasgow relatively unscathed, but these were now joined by the 8.2-inch guns of Gneisenau. John Luce, captain of Glasgow, concluded that nothing was to be gained by staying and attempting to fight. It was noticed that each time he fired, the flash of his guns was used by the Germans to aim a new salvo, so he also ceased firing. One compartment of the ship was flooded, but she could still manage 24 knots. He returned first to Monmouth, which was now dark but still afloat. Nothing could be done for the ship, which was sinking slowly but would attempt to beach on the Chilean coast. Glasgow turned south and departed. There was some confusion amongst the German ships as to the fate of the two armoured cruisers, which had disappeared into the dark once they ceased firing and a hunt began. Leipzig saw something burning, but on approaching found only wreckage. Nürnberg, slower than the other German ships, arrived late at the battle and sighted Monmouth, listing and badly damaged but still moving. After pointedly directing his searchlights at the ship's ensign, an invitation to surrender, which was declined, he opened fire, finally sinking the ship. Without firm information, von Spee decided that Good Hope had escaped and called off the search at 2215. Mindful of the reports that a British battleship was around somewhere, he turned north. With no survivors from either Good Hope or Monmouth, 1,600 British officers and men were dead with Cradock among them. Glasgow and Otranto both escaped, (the former suffering five hits and five wounded men). Just two shells had struck Scharnhorst, neither of which exploded: one 6-inch shell hit above the armour belt and penetrated to a storeroom where, in von Spee's words, "the creature just lay there as a kind of greeting." Another struck a funnel. In return, Scharnhorst had managed at least 35 hits on Good Hope, but at the expense of 422 8.2-inch shells, leaving her with 350. Four shells had struck Gneisenau, one of which nearly flooded the officers' wardroom. A shell from Glasgow struck her after turret and temporarily knocked it out. Three of Gneisenau's men were wounded; she expended 244 of her shells and had 528 left.
Aftermath
Von Spee commented afterward on the British tactics. He had been misinformed that the battleship Canopus sighted in the area was a relatively modern Queen-class ship, whereas it was a similar looking, old and barely seaworthy Canopus-class battleship, but nonetheless had four 12-inch guns and ten 6-inch guns. Von Spee believed he would have lost the engagement had all the British ships been together. Despite his victory he was pessimistic of the real harm done to the British navy and also of his own chances of survival. Cradock had been less convinced of the value of Canopus, being too slow at 12 knots to allow his other ships freedom of movement and manned only by inexperienced reservists. The official explanation of the defeat as presented to the House of Commons by Winston Churchill stated: "feeling he could not bring the enemy immediately to action as long as he kept with Canopus, he decided to attack them with his fast ships alone, in the belief that even if he himself were destroyed... he would inflict damage on them which ...would lead to their certain subsequent destruction." On 3 November, Scharnhorst, Gneisenau and Nürnberg entered Valparaiso harbour and were welcomed as heroes by the German population. Von Spee refused to join in the celebrations: presented with a bunch of flowers he commented, "these will do nicely for my grave". He was to die with most of the men on his ships approximately one month later at the Battle of the Falkland Islands, on 8 December 1914.
John Doran- Relief by French forces E Battery 3rd Brigade RHA
With 5th Cavalry Brigade about 1 mile southwest of Dickebusch. At 0530 Lt Maxwell's section (1 gun) went back to assist in retaking the Wind Mill Ridge at Wytschaete which was brilliantly done by the 12th Lancers. Section in action in firing line. French reinforcements coming up, the 5th Cavalry Brigade was withdrawn to Kemmel. Bivouaced at 1830 one mile SW of Dickebusch - the French taking over our part of the line.
war diaries- 3rd Monmouths to defend East Coast The 3rd Monmouths left Northampton in November moved to work on the East Coast Defensive System where trenches were dug and when finished they were equipped with shelters, barbed wire and machine -guns. At this time the threat of an invasion was considered to be real enough and the tedium of routine work was relieved by rumours of bombardments and attempted landings. At this time the British Army in France was fighting against heavy odds, the advance of the German Army appeared to be only temporarily checked. This situation gave rise to great anxiety for all. So when orders were received that the Battalion were to return to Northampton to refit for service in India, the prospect of serving in India was not very well received. The Indian equipment soon arrived for the Battalion but to everyone's relief the orders for India were countermanded. As the arrangements were not completed for sending the Battalion anywhere overseas they were to return to the East Coast and continue working on the defence line in Suffolk . The Battalion stayed here until January 1915.
A vast amount of work was achieved while on the East Coast, miles of trenches dug, wire entanglements and shelters put in place and all in unfavourable weather conditions. The G.O.C.-in C. Central Force giving much praise to the Battalion for the accomplishment it had achieved issued a special order.
- Training
- Flanders
- Continued enemy attacks
- 1st North Staffs take over Trenches
- In the Line
- Yeomen In Action
- Enemy All Around
- London Scottish in Action
- Under Heavy Bombardment
- Entrenching
- In Action
- Reliefs
- Shelling
- Ruins
- Bombardment
- In Reserve
- On the March
- Orders
- On the March
- Into Billets
- Church Parade
- On the Move
- Training
- Trenches
- German Attack
- Dispositions
- Church Parade
- Reorganisation
- On the Move
- Reliefs
- No Change
- Reorganisation
- On the Move
- Reorganisation
Can you add to this factual information? Do you know the whereabouts of a unit on a particular day? Do you have a copy of an official war diary entry? Details of an an incident? The loss of a ship? A letter, postcard, photo or any other interesting snipts?If your information relates only to an individual, eg. enlistment, award of a medal or death, please use this form: Add a story.
Killed, Wounded, Missing, Prisoner and Patient Reports published this day.
This section is under construction.
Want to know more about 1st of November 1914?
There are:45 items tagged 1st of November 1914 available in our Library
These include information on officers, regimental histories, letters, diary entries, personal accounts and information about actions during the Great War.
Remembering those who died this day, 1st of November 1914.
Able Seaman Harold James Abrams. H.M.S. Good Hope. Read their Story. Leading Seaman Ernest Hector Alexander Adams. H.M.S. Good Hope. Read their Story. Stoker 1st Class George Adams. H.M.S. Good Hope. Read their Story. Stoker 2nd Class Percy Adams. H.M.S. Monmouth. Read their Story. Stoker 1st Class Richard Adams. H.M.S. Monmouth. Read their Story. Signal Boy Roland Adams. H.M.S. Good Hope. Read their Story. Stoker 1st Class Walter Adams. H.M.S. Good Hope. Read their Story. Able Seaman Walter Frederick Adams. H.M.S. Good Hope. Read their Story. Warrant Mechanician George. Addis. H.M.S. Good Hope. Read their Story. Officers Steward 2nd Clas William John Thomas Addyman. H.M.S. Good Hope. Read their Story. Able Seaman Lewis Adlam. H.M.S. Monmouth. Read their Story. Stoker 1st Class Sam Winn Airey. H.M.S. Monmouth. Read their Story. Armourers Mate Arthur Alderton. H.M.S. Good Hope. Read their Story. Able Seaman John William Aldred. H.M.S. Good Hope. Read their Story. Private David Aldridge. H.M.S. Good Hope. Read their Story. Stoker Charles Alexander. H.M.S. Good Hope. Read their Story. Blacksmiths Mate Thomas Alfred Alexander. H.M.S. Good Hope. Read their Story. Boy 1st Class John Alfred Phillips Alford. H.M.S. Monmouth. Read their Story. Stoker Alime. H.M.S. Good Hope. Read their Story. Boy 1st Class Andrew Allan. H.M.S. Monmouth. Read their Story. Stoker 1st Class Herbert Allcorn. H.M.S. Good Hope. Read their Story. Petty Officer Henry Allen. H.M.S. Good Hope. Read their Story. Leading Stoker Joseph Allinson. H.M.S. Good Hope. Read their Story. Leading Seaman James Alsbury. H.M.S. Good Hope. Read their Story. Petty Officer 1st Class John Ames. H.M.S. Good Hope. Read their Story. Stoker 1st Class Harry Pearce Ancill. H.M.S. Good Hope. Read their Story. Able Seaman Henry Small Anderson. H.M.S. Good Hope. Read their Story. Corporal John Wainwright Anderton. H.M.S. Good Hope. Read their Story. Stoker 2nd Class Charles Frederick Andrews. H.M.S. Monmouth. Read their Story. Stoker 1st Class Frederick John Andrews. H.M.S. Good Hope. Read their Story. Stoker 1st Class William Christopher Ansell. H.M.S. Good Hope. Read their Story. Signal Boy Alfred Starkey Appleby. H.M.S. Monmouth. Read their Story. Able Seaman John Henry Armes. H.M.S. Good Hope. Read their Story. Boy 1st Class Bernard James Armstrong. H.M.S. Monmouth. Read their Story. Stoker George Ashby. H.M.S. Good Hope. Read their Story. Chief Engine Room Artific Joseph Ashton. H.M.S. Monmouth. Read their Story. Stoker 1st Class James Ashurst. H.M.S. Good Hope. Read their Story. Leading Stoker Edmund Ashworth. H.M.S. Good Hope. Read their Story. Sergeant John Henry Askew. H.M.S. Good Hope. Read their Story. Stoker 1st Class Francis Atherton. H.M.S. Monmouth. Read their Story. Able Seaman John Atkins. H.M.S. Good Hope. Read their Story. Gunner Arthur Charles Attwood. H.M.S. Good Hope. Read their Story. Musician Albert Edward Augarde. H.M.S. Monmouth. Read their Story. Ships Steward Archibold John Authers. H.M.S. Monmouth. Read their Story. Able Seaman Fred Avis. H.M. T.B. No. 96. Read their Story. Stoker 1st Class Harry Avis. H.M.S. Good Hope. Read their Story. Able Seaman George Howard Axworthy. H.M.S. Monmouth. Read their Story. Musician Thomas Valentine Aylward. H.M.S. Monmouth. Read their Story. Lt. Maurice John Hervey Bagot. HMS Monmouth Read their Story. Gnr. Denis Francis Begley. HMS Good Hope Read their Story. L/Sgt. David Berney. 2nd Btn. Connaught Rangers Read their Story. Able.Sea. Francis Jeffares Tilson Boxwell. HMS Good Hope Read their Story. Pte. Harry Carr. 1st Btn. Northumberland Fusiliers Read their Story. Able Sea. Ralph Ernest Cornock. HMS Monmouth Read their Story. Edward Davey. HMS Monmouth Read their Story. W.Eng. Charles William Driver. HMS Monmouth Read their Story. CPO. Charles Dungey. HMS Monmouth Read their Story. Pte. Albert Edward Goldsworthy. 1st Battalion Lincolnshire Regiment Carp. Albert J. Hellyer. HMS Good Hope Stkr.1st.Cl. William Pascoe Hender. HMS Monmouth Read their Story. Able Sea. Thomas Pinch Lamerton. HMS Monmouth Read their Story. Pte. Charles Frank Randall. 1st Btn. Royal Berkshire Regiment Read their Story. Pte. Abner Edwin Sanders. 1st Battalion Northumberland Fusiliers Read their Story. Pte. Abner Edwin Sanders. 1st Battalion Northumberland Fusiliers Read their Story. CPO. Frederick Sercombe. HMS Monmouth Read their Story. Pte. Charles Albert Thacker. 1st Battalion Lincolnshire Regiment Stok1. Garn Wood. HMS Monmouth Read their Story. Add a name to this list.
Select another Date
The free section of The Wartime Memories Project is run by volunteers.
This website is paid for out of our own pockets, library subscriptions and from donations made by visitors. The popularity of the site means that it is far exceeding available resources and we currently have a huge backlog of submissions.
If you are enjoying the site, please consider making a donation, however small to help with the costs of keeping the site running.
Hosted by:

The Wartime Memories Project Website
is archived for preservation by the British Library
Copyright MCMXCIX - MMXXIV
- All Rights Reserved -We do not permit the use of any content from this website for the training of LLMs or for use in Generative AI, it also may not be scraped for the purpose of creating other websites.