Great War>Ships
|
|
- SS Seydlitz during the Great War -
Great War>Ships

This website uses cookies. By continuing to use this site you agree to accept cookies.
If you enjoy this site please consider making a donation.
Site Home
Help & FAQs
Features
Submissions
Information
Advertisements
World War 1 One ww1 wwII greatwar great 1914 1918 first battalion regiment


SS Seydlitz
8th December 1914 Battle of the Falklands
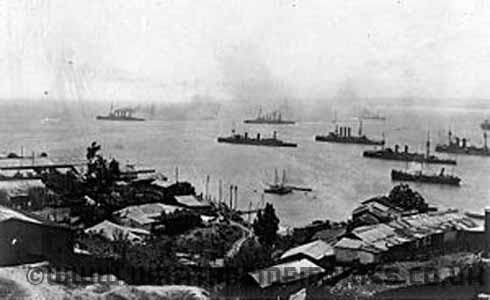
German East Asia Squadron leaving Valparaiso, Chile. (4 Nov 1914)
The Battle of the Falkland Islands took place on the 8th December 1914 during the First World War in the South Atlantic. The British, suffering a defeat at the Battle of Coronel on 1 November, had sent a large force to track down and destroy the victorious German cruiser squadron. Admiral Graf Maximilian von Spee commanded the German squadron which consisted of two armoured cruisers SMS Scharnhorst and Gneisenau, three light cruisers SMS Nürnberg, Dresden and Leipzig together with three auxiliarie. They attempted to raid the British supply base at Stanley in the Falkland Islands.
A larger British squadron, consisting of two battlecruisers HMS Invincible and Inflexible, three armoured cruisers HMS Carnarvon, Cornwall and Kent and two light cruisers HMS Bristol and Glasgow had arrived in the port only the day before. Visibility was at its maximum, the sea was calm with a light northwesterly breeze and a bright sunny day. The German squadron had been detected early on and by nine o'clock that morning the British were in hot pursuit of the five German vessels who had taken flight to the southeast.
The only ships to escape were the light cruiser Dresden and the auxiliary Seydlitz- all the others were sunk. The British battlecruisers each mounted eight 12 inch guns, whereas Spee's heaviest ships (Scharnhorst and Gneisenau), were only equipped with eight 8.3 inch guns. Additionally, the British battlecruisers could make 29.3 mph against Spee's 25.9 mph. So the British battlecruisers could not only outrun their opponents but significantly outgun them too. The old pre-dreadnought battleship, HMS Canopus, had been grounded at Stanley to act as a makeshift defence battery for the area.
At the outbreak of hostilities in World War One, the German East Asian squadron, which Admiral Spee commanded, was heavily outnumbered by the Royal Navy and the Japanese Navy. The German High Command realised that the Asian possessions could not be defended and that the squadron might not survive. Spee therefore tried to get his ships home via the Pacific and Cape Horn, but was pessimistic of their chances. Following von Spee's success at Coronel off the coast of Valparaíso, Chile, where his squadron sank the cruisers HMS Good Hope and Monmouth, von Spee's force put into Valparaíso. As required under international law for belligerent ships in neutral countries, the ships left within 24 hours, moving to Mas Afuera, 400 miles off the Chilean coast. There they received news of the loss of the cruiser SMS Emden, which had previously detached from the squadron and had been raiding in the Indian Ocean. They also learned of the fall of the German colony at Tsingtao in China, which had been their home port. On 15 November, the squadron moved to Bahia San Quintin on the Chilean coast, where 300 Iron Crosses second class were awarded to the crew, and an Iron Cross first class to Admiral Spee. Spee was advised by his officers to return to Germany if he could. His ships had used half their ammunition at Coronel, and had difficulties obtaining coal. Intelligence reported the British ships HMS Defence, Cornwall and Carnarvon were stationed in the River Plate and that there were no British warships at Stanley. Spee had been concerned about reports of a British battleship, Canopus, but its location was unknown.
On 26 November, the squadron set sail and reached Cape Horn on the 1st December, anchoring at Picton Island for 3 days coaling from acaptured British collier, the Drummuir. On 6 December, the British vessel was scuttled and the crew transferred to the auxiliary Seydlitz. Spee proposed to raid the Falkland Islands before turning north to sail up the Atlantic back to Germany even though it was unnecessary and opposed by three of his captains.
On the 30th October, retired Admiral of the Fleet Sir John Fisher was reappointed First Sea Lord to replace Admiral Prince Louis of Battenberg. On the 3rd November, Fisher was advised that Spee had been sighted off Valparaíso and acted to reinforce Cradock by ordering Defence,to join his squadron. On the 4th November, news of the defeat at Coronel arrived. As a result, the battlecruisers Invincible and Inflexible were detached from the Grand Fleet and sailed for Plymouth to prepare for overseas service. Chief of Staff at the Admiralty was Vice-Admiral Doveton Sturdee with whom Fisher had a long-standing disagreement, so he took the opportunity to appoint Sturdee as Commander-in-Chief, South Atlantic and Pacific, to command the new squadron from Invincible. On 11 November, Invincible and Inflexible left Devonport. Repairs to Invincible were incomplete and she sailed with workmen still on board. The ships travelled at a reduced 12 mph as running at high speed used significantly more coal, so to complete the long journey it was necessary to travel at the most economic speed. The two ships were also heavily loaded with supplies. Sturdee arrived at the Abrolhos Rocks on the 26th November, where Rear Admiral Stoddart awaited him with the remainder of the squadron. Sturdee announced his intention to depart for the Falkland Islands on 29 November. From there, the fast light cruisers Glasgow and Bristol would patrol seeking Spee, summoning reinforcements if they found him. Captain Luce of Glasgow, who had been at the battle of Coronel persuaded Sturdee to depart a day early. The squadron was delayed during the journey for 12 hours when a cable towing targets became wrapped around one of Invincible's propellers, but the ships arrived on the morning of 7 December. The two light cruisers moored in to the inner part of Stanley Harbour, while the larger ships remained in the deeper outer harbour of Port William. Divers set about removing the offending cable from Invincible, Cornwall's boiler fires were extinguished to make repairs, and Bristol had one of her engines dismantled. The famous ship SS Great Britain, reduced to a coal bunker, supplied coal to Invincible and Inflexible. The armed merchant cruiser Macedonia was ordered to patrol the harbour, while Kent maintained steam ready to replace Macedonia the next day, 8th December. Spee's fleet arrived in the morning of the same day.
Two of Spee's cruisers—Gneisenau and Nürnberg—approached Stanley first and, at that time, the entire British fleet was still coaling. Some believe that, had Spee pressed the attack, Sturdee's ships would have been easy targets. Any British ship trying to leave would have faced the full firepower of the German ships and having a vessel sunk might also have blocked the rest of the British squadron inside the harbour. Fortunately for the British, the Germans were surprised by gunfire from an unexpected source as Canopus, which had been grounded as a guardship and was hidden behind a hill, opened fire. This was enough to check the Germans' advance. The sight of the distinctive tripod masts of the British battlecruisers confirmed that they were facing a better-equipped enemy. Kent was already making her way out of the harbour and had been ordered to pursue Spee's ships. Made aware of the German ships, Sturdee had ordered the crews to breakfast, knowing that Canopus had bought them time while steam was raised. To Spee, with his crew battle-weary and his ships outgunned, the outcome seemed inevitable. Realising his danger too late, and having lost any chance to attack the British ships while they were at anchor, Spee and his squadron dashed for the open sea. The British left port around 1000. Spee was ahead by 15 miles but there was a lot of daylight left for the faster battlecruisers to catch them.
It was 1300 when the British battlecruisers opened fire, but it took them half an hour to get the range of Leipzig. Realising that he could not outrun the British ships, Spee decided to engage them with his armoured cruisers to give the light cruisers a chance to escape. They turned to fight just after 1320. The German armoured cruisers had the advantage of a freshening north-west breeze which caused the funnel smoke of the British ships to obscure their targets practically throughout the action. Despite initial success by Scharnhorst and Gneisenau in striking Invincible, the British capital ships suffered little damage. Spee then turned to escape, but the battlecruisers came within extreme firing range 40 minutes later. Invincible and Inflexible engaged Scharnhorst and Gneisenau, while Sturdee detached his cruisers to chase Leipzig and Nürnberg. Inflexible and Invincible turned to fire broadsides at the armoured cruisers and Spee responded by trying to close the range. His flagship Scharnhorst suffered extensive damage with funnels flattened, fires and developed a list. The list became worse at 1604, and she sank by 1617. Gneisenau continued to fire and evade until 1715, by which time her ammunition had been exhausted, and her crew allowed her to sink at 1802. During her death throes, Admiral Sturdee continued to engage Gneisenau with his two battlecruisers and the cruiser Carnarvon seemingly ignoring the escaping Dresden. 190 of Gneisenau's crew were rescued from the water. The battlecruisers had received about 40 hits, with one man killed and four injured. Meanwhile, Nürnberg and Leipzig had run from the British cruisers. Nürnberg was running at full speed while the crew of the pursuing Kent were pushing her boilers and engines to the limit. Nürnberg finally turned for battle at 1730. Kent had the advantage in shell weight and armour. Nürnberg suffered two boiler explosions around 1830, giving further advantage in speed and manoeuvrability to Kent. The German ship then rolled over at 1927 after a long chase. The cruisers Glasgow and Cornwall had chased down Leipzig. Glasgow closed to finish Leipzig which had run out of ammunition but was still flying her battle ensign. Leipzig fired two flares, so Glasgow ceased fire. At 2123, more than 80 miles southeast of the Falklands, she also rolled over, leaving only 18 survivors.
The British suffered only very light casualties and damage whereas Admiral Spee and his two sons were among the German dead. There were 215 rescued German survivors who became prisoners on the British ships. Most were from the Gneisenau, nine were from Nürnberg and 18 were from Leipzig. There were no survivors from Scharnhorst. Of the known German force of eight ships, two escaped, the auxiliary Seydlitz and the light cruiser Dresden, which roamed at large for a further three months before she was cornered by a British squadron off the Juan Fernández Islands on 14 March 1915. After fighting a short battle, Dresden's captain evacuated his ship and scuttled her by detonating the main ammunition magazine. As a consequence of the battle, German commerce raiding on the high seas by regular warships of the Kaiserliche Marine was brought to an end. However, Germany put several armed merchant vessels into service as commerce raiders until the end of the war.
31st May 1916 Battle of Jutland On 31 May 1916, the 2nd Battlecruiser Squadron consisted of HMS New Zealand (flagship of Rear Admiral William Christopher Pakenham) and HMS Indefatigable. (Australia was still under repair following her collision with New Zealand.) The squadron was assigned to Admiral Beatty's Battlecruiser Fleet, which had put to sea to intercept a sortie by the High Seas Fleet into the North Sea. The British were able to decode the German radio messages and left their bases before the Germans put to sea. Hipper's battlecruisers spotted the Battlecruiser Fleet to their west at 1520, but Beatty's ships didn't spot the Germans to their east until 1530. Two minutes later, he ordered a course change to east-south-east to position himself astride the German's line of retreat and called his ships' crews to action stations. He also ordered the 2nd BCS, which had been leading, to fall in astern of the 1st BCS. Hipper ordered his ships to turn to starboard, away from the British, to assume a south-easterly course, and reduced speed to 18 knots to allow three light cruisers of the 2nd Scouting Group to catch up. With this turn, Hipper was falling back on the High Seas Fleet, then about 60 miles behind him. Around this time, Beatty altered course to the east as it was quickly apparent that he was still too far north to cut off Hipper. Thus began the so-called "Run to the South" as Beatty changed course to steer east-south-east at 1545, paralleling Hipper's course, now that the range closed to under 18,000 yards. The Germans opened fire first at 3:48, followed by the British. The British ships were still in the process of making their turn, and only the two leading ships, HMS Lion and HMS Princess Royal, had steadied on their course when the Germans opened fire. The British formation was echeloned to the right with Indefatigable in the rear and the furthest to the west, and New Zealand ahead of her and slightly further east. The German fire was accurate from the beginning, but the British overestimated the range as the German ships blended into the haze. Indefatigable aimed at SMS Von der Tann, while New Zealand, unengaged herself, targeted SMS Moltke. By 3:54, the range was down to 12,900 yards (11,800 m) and Beatty ordered a course change two points to starboard to open up the range at 3:57. Indefatigable was destroyed at about 4:03, when her magazines exploded. After Indefatigable's loss, New Zealand shifted her fire to Von der Tann in accordance with Beatty's standing instructions. The range had grown too far for accurate shooting, so Beatty altered course four points to port to close the range again between 1612 and 1615. By this time, the 5th Battle Squadron, consisting of four Queen Elizabeth-class battleships, had closed up and was engaging Von der Tann and Moltke. At 1623, a 13.5-inch shell from HMS Tiger struck near Von der Tann's rear turret, starting a fire among the practice targets stowed there that completely obscured the ship and caused New Zealand to shift fire to Moltke. At 1626, the ship was hit by an 11 inch shell, fired by Von der Tann, on 'X' barbette that detonated on contact and knocked loose a piece of armour that briefly jammed 'X' turret and blew a hole in the upper deck. Four minutes later, Southampton, scouting in front of Beatty's ships, spotted the lead elements of the High Seas Fleet charging north at top speed. Three minutes later, she sighted the topmasts of Vice-Admiral Reinhard Scheer's battleships, but did not transmit a message to Beatty for another five minutes. Beatty continued south for another two minutes to confirm the sighting himself before ordering a sixteen point turn to starboard in succession. New Zealand, the last ship in the line, turned prematurely to stay outside the range of the oncoming battleships. A chunk of armour knocked from New Zealand's 'X' turret during the Battle of Jutland on display at the Torpedo Bay Navy Museum in Auckland New Zealand was straddled several times by the battleship SMS Prinzregent Luitpold but was not hit. Beatty's ships maintained full speed in an attempt to increase the distance between them and the High Seas Fleet and gradually moved out of range. They turned north and then north-east to try to rendezvous with the main body of the Grand Fleet. At 1740, they opened fire again on the German battlecruisers. The setting sun blinded the German gunners and, as they could not make out the British ships, they turned away to the north-east at 1747. Beatty gradually turned more towards the east to allow him to cover the deployment of the Grand Fleet in battle formation and to move ahead of it, but he mistimed his manoeuvre and forced the leading division to fall off towards the east, further away from the Germans. By 1835, Beatty was following Indomitable and HMS Inflexible of the 3rd BCS as they were steering east-south-east, leading the Grand Fleet, and continuing to engage Hipper's battlecruisers to their south-west. A few minutes earlier, Scheer had ordered a simultaneous 180° starboard turn and Beatty lost sight of the High Seas Fleet in the haze. Twenty minutes later, Scheer ordered another 180° turn which put them on a converging course again with the Grand Fleet, which had altered course to the south. This allowed the Grand Fleet to cross Scheer's T, forming a battle line that cut across his battle line and badly damaging his leading ships. Scheer ordered yet another 180° turn at 1913 in an attempt to extricate the High Seas Fleet from the trap into which he had sent them. This was successful and the British lost sight of the Germans until 2005, when HMS Castor spotted smoke bearing west-north-west. Ten minutes later, she had closed the range enough to identify German torpedo boats, and engaged them. Beatty turned west upon hearing gunfire and spotted the German battlecruisers only 8,500 yards away. Inflexible opened fire at 2020, followed by the rest of Beatty's battlecruisers.New Zealand and Indomitable concentrated their fire on SMS Seydlitz, and hit her five times before she turned west to disengage. Shortly after 2030, the pre-dreadnought battleships of Rear Admiral Mauve's II Battle Squadron were spotted and fire switched to them. The Germans had poor visibility and were able to fire only a few rounds at them before turning away to the west. The British battlecruisers hit the German ships several times before they blended into the haze around 2040. After this, Beatty changed course to south-south-east and maintained that course, ahead of both the Grand Fleet and the High Seas Fleet, until 0255 the next morning, when the order was given to reverse course and head home.
New Zealand fired 420 twelve-inch shells during the battle, more than any other ship on either side. Despite this, only four successful hits were credited to the battlecruiser. Three on Seydlitz and one on the pre-dreadnought SMS Schleswig-Holstein. She was hit only once during the battle, confirming for the crew the piupiu and tiki worn by her new captain, J.F.E. (Jimmy) Green, brought good luck.
If you can provide any additional information, please add it here.
These include information on officers, regimental histories, letters, diary entries, personal accounts and information about actions during the Great War.
Those known to have served on
SS Seydlitz
during the Great War 1914-1918.